AI Video Lip Sync 2026: How to Test Dubbing Without Unnatural Mouth Movement
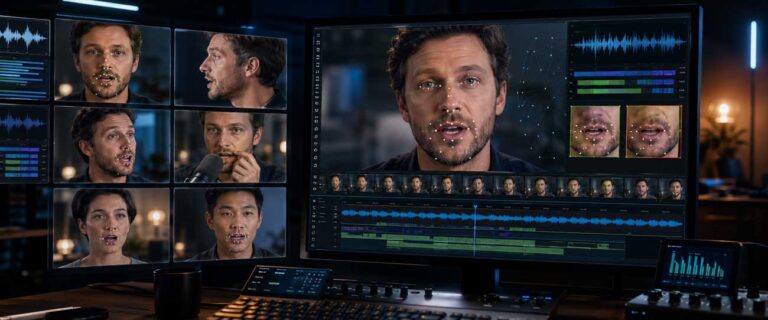
AI video lip-sync is easy to demo but much harder to evaluate properly. A frontal talking head can look convincing, while the same system breaks on a profile face, a head turn, visible teeth, facial hair, fast speech or a hand crossing the mouth. For dubbing and localisation, the real test is whether the system can change articulation without damaging the speaker’s identity, expression or timing. This guide gives you a repeatable way to test existing video footage rather than judging polished avatar demos. It covers temporal sync, visible speech shapes, translated sentence length, multiple speakers, occlusion, retry rate and the amount of manual repair needed before a clip is publishable.
The fastest useful AI video lip-sync test
| Step | What to lock down | What you are looking for |
|---|---|---|
| 1. Fix the audio | Use the same final audio file for every render. | No platform gets an easier script, different pauses or cleaner timing. |
| 2. Fix the footage | Use the same short source clips, including difficult angles. | You are comparing lip-sync systems, not source-video quality. |
| 3. Fix the render mode | Use the closest equivalent quality setting on every tool. | A fast preview is not compared with another tool’s highest-quality mode. |
| 4. Scrub visible speech events | Check lip closures, teeth contact and speech start/stop points frame by frame. | The mouth should follow the audio without obvious early or late articulation. |
| 5. Inspect the whole face | Compare teeth, beard, jawline, cheeks and expression with the source. | Good timing does not excuse identity-changing facial edits. |
| 6. Stress recovery | Use head turns, occlusion and speaker changes. | The model must recover cleanly after difficult frames instead of popping or drifting. |
| 7. Count production cost | Record retries and manual repair time. | The useful metric is cost per accepted clip, not cost per generation. |
A good first pass only needs 30 to 60 seconds of source footage. If a tool cannot survive that controlled stress reel, spending credits on ten-minute videos usually tells you less, not more.
Do not let talking-photo demos contaminate a video lip-sync test
Search results for lip-sync AI often mix two different jobs: making a still image talk and re-articulating a real performance that already contains head motion, expression, lighting changes and occlusion. They should not be judged as the same task.
A talking-photo generator can create a relatively controlled facial movement from a single reference. Video-to-video lip sync must preserve everything already happening while changing only speech-related motion. A tool that looks excellent on a static portrait may still fail badly on a person turning away from the camera or speaking behind a microphone.
For this query, use real video as the primary test input. Treat talking-photo performance as a separate capability rather than a shortcut to a favourable result.
Build one hard footage pack and never change it between tools
The most useful test pack is short, repeatable and deliberately unpleasant for the model. Keep the camera, source footage and dubbed audio identical between providers.
| Test clip | Why it belongs | Failure to watch for |
|---|---|---|
| Frontal face, normal pace | Establishes the easy baseline. | Basic lag, floating mouth edges or over-animated jaw movement. |
| 45-degree profile with a head turn | Forces the system to track changing face geometry. | Mouth sliding, jaw distortion or a sudden quality drop mid-turn. |
| Visible teeth and repeated plosives | Creates obvious visual speech landmarks. | Teeth changing shape, lips failing to close or closures landing at the wrong moment. |
| Beard or moustache | Tests a moving mouth boundary with fine texture around it. | Soft beard edges, smeared jawline or hair disappearing around the lips. |
| Fast speech | Reduces the time available for each visible mouth shape. | Generic open-close motion that stops following individual syllables. |
| Hand or microphone crossing the mouth | Tests occlusion handling. | The generated mouth appears through the object or pops when it reappears. |
| Two speakers in one shot | Tests active-speaker selection. | The listener’s mouth moving, both faces being edited, or a speaker switch happening late. |
| Partially hidden mouth | Tests whether the model can leave uncertain pixels alone. | Invented lip detail where the source never showed a full mouth. |
Do not replace a failed source clip with an easier one for one provider. The point is to find the system’s boundary, not to curate a demo reel.
Use visible phonemes as timing anchors instead of asking whether it “looks synced”
Frame-by-frame review becomes much easier if the script contains speech sounds with clear visible events. The sounds p, b and m normally require the lips to close. F and v create a different visible relationship between the lower lip and upper teeth. These are useful checkpoints because a vague open vowel is much harder to judge precisely by eye.
A test line such as “Peter packed five blue boxes before moving them very quickly” gives you repeated closures and lip-to-teeth transitions in a short sequence. Scrub the original and generated versions around those events, then watch both again at normal speed.
Do not reduce the assessment to a single-frame rule. Real speech involves coarticulation, so the mouth begins preparing for the next sound before the previous one has fully ended. What matters is repeated, perceptible timing error: closures consistently early, consonants arriving after the audio, or the mouth continuing to articulate after the spoken phrase has stopped.
The mouth can be in sync while the face is still wrong
This is the failure class that simple lip-sync demos most often miss. A model can hit the broad rhythm of the audio yet make the speaker look subtly unlike themselves. In real viewing, altered teeth, a softened beard edge or an unstable jaw can be more distracting than a small timing error.
| Area | What to compare with the source |
|---|---|
| Teeth | Shape, spacing, brightness and whether teeth appear in frames where the source mouth would keep them hidden. |
| Jawline | Width, chin position and whether the lower face pulses as speech changes. |
| Facial hair | Texture continuity around the lips and whether hair is blurred or erased during articulation. |
| Cheeks and smile lines | Whether the generated mouth changes the surrounding expression rather than only the speech motion. |
| Skin and lighting | Local colour, sharpness and flicker around the edited region. |
| Speech boundaries | Whether the generated region snaps into a different face at the start or end of dialogue. |
A recurring production complaint is that the viewer cannot immediately describe the defect, but the face simply feels wrong. That is why a publishable test needs both normal-speed viewing and a source-versus-output frame check. Timing alone is too narrow.
Translation length is a dubbing problem before it becomes a lip-sync problem
Translated dialogue rarely lasts exactly as long as the source line. If you force a literal translation into the original time window, the voice may become unnaturally fast. If you let the translated line run longer, the lip-sync model has to generate speech motion beyond the original performance rhythm.
Run two versions of the translation test. First, use a faithful translation without attempting to match duration. This is the stress test. Second, create a production version that preserves the meaning while being rewritten to fit the original speaking time naturally. The second version tells you much more about what a localisation workflow can actually publish.
Log any platform that silently trims pauses, rewrites translations, changes speaking speed, or replaces your audio. Those changes can make the final video look better, but you are no longer comparing the lip-sync engine against identical input.
Multiple speakers reveal whether the system understands who is actually talking
Single-speaker demos avoid one of the hardest practical cases. Put two people in the frame, alternate dialogue, then add one short overlap where one speaker begins before the other has completely stopped.
Watch for three errors: the listener being animated, both mouths moving from the same audio, or the active face changing a fraction too late at the handover. Repeat the test with one speaker larger in frame than the other. Some systems effectively treat face size or visibility as a shortcut for speaker selection, which can break an interview or panel shot.
If a product only supports one speaker per render, that is not necessarily a poor result. It is a workflow limitation. The important part is to surface it before you build a localisation pipeline around footage containing interviews, conversations, or reaction shots.
Occlusion and head turns test recovery, not just individual frames
Do not only inspect the frame where the mouth is covered. Inspect the five to ten frames before the obstruction, the covered section, and the first visible frames after it. A model may sensibly stop generating a mouth behind a hand, then re-enter with the wrong lip shape, a different set of teeth or a visible jump in sharpness.
Head turns create the same problem in a less obvious form. The difficult moment is often not a full profile. It is the transition from a three-quarter view to a profile and back again, where the model must keep its identity and articulation stable while the visible mouth geometry changes rapidly.
Control the audio before blaming the video model
A lip-sync engine can only follow the timing it receives. Use a single audio file for each provider, and avoid regenerating the voice within each platform unless you are specifically testing an end-to-end dubbing product. Keep the same pauses, breaths and sentence boundaries.
Fast synthetic speech with poor phrasing can make accurate lip movement look mechanical because the mouth is correctly following an unnatural performance. Conversely, manually stretching audio after lip sync can create a visible error that was not present in the generated file. Freeze the audio first, then evaluate the visual system.
Compare the same quality mode, or the result is meaningless
Some platforms expose different modes for latency and fidelity. HeyGen, for example, documents a separate Lipsync Precision mode for higher-accuracy processing. A fair comparison should record the exact mode or model used and match the test goal: fastest usable output against fastest usable output, or maximum-quality output against maximum-quality output.
Do not publish a winner after comparing one provider’s preview render with another provider’s premium model. The model name, mode, resolution and any face-enhancement setting belong in the test log.
Measure cost per accepted minute, not cost per generated minute
Lip-sync pricing can look cheap until a difficult shot takes three attempts and still needs manual repair. The production cost is better expressed as:
Effective cost = generation spend + retry spend + editor repair time
For each tool, log the number of attempts, how many clips were accepted without repair, and how many minutes an editor spent fixing starts, ends, speaker switches or audio timing. If you need to hide a failed mouth with a cutaway every 20 seconds, the platform may still be usable, but it does not deliver reliable automatic dubbing.
A conventional editor remains part of the practical fallback workflow. Our CapCut review covers the broader editing workflow, but the lip-sync test should record every manual fix rather than pretending post-production was free.
See more of our reporting in Google Top Stories, AI Overviews and AI Mode.
Which type of AI lip-sync system should you test?
| System type | Typical examples | Best fit | Hidden limitation to test |
|---|---|---|---|
| End-to-end dubbing and localisation | HeyGen, Captions | Teams that want translation, voice and mouth editing in one workflow. | Less control over how translation, timing and audio are changed internally. |
| Dedicated lip-sync engine or API | Sync Labs and similar specialist APIs | Production pipelines that already control translation and voice generation. | More integration work and potentially separate costs for speech generation. |
| Avatar-led video platform | Presenter and digital-avatar systems | Training, explainers and repeatable talking-head content. | A controlled avatar result does not prove the tool can repair arbitrary real footage. |
| Local open-source workflow | Wav2Lip, MuseTalk and related projects | Technical teams that want local processing and deeper control. | Setup, GPU requirements, face restoration and hard-shot consistency become your responsibility. |
If you are still choosing the wider video stack, our best AI video generators comparison covers scene generators, avatar systems and production workspaces. For this test, narrow the question: can the lip-sync stage preserve a real performance in difficult footage?
A publishable lip-sync gate is more useful than an average
For dubbing work, use critical failures rather than averaging everything into one flattering number. Reject a clip if any of the following is clearly visible at normal playback speed:
- The lips repeatedly close before or after obvious consonants;
- Teeth, jaw shape or facial hair change enough to alter the speaker’s appearance;
- The wrong person is animated in a multi-speaker shot;
- The mouth pops, smears or changes identity after a head turn or occlusion;
- The translated delivery has been sped up or stretched to an unnatural cadence;
- Speech begins or ends with a visible generated-region jump.
A tool can fail one difficult shot and still be valuable. The editorial question is whether the failure is predictable enough to route around. If profiles fail but frontal shots are clean, you can design a workflow around that limitation. If failure appears randomly on ordinary footage, every long video becomes a quality-control problem.
The 30-minute acceptance workflow
- Prepare a 30 to 60-second stress reel. Include a frontal line, head turn, profile, teeth, facial hair, occlusion and two speakers.
- Lock one audio master. Use the same file everywhere before testing built-in translation or voice generation.
- Render once at the intended production setting. Record model, quality mode, resolution and processing options.
- Watch at normal speed without scrubbing. Mark only defects you can actually perceive.
- Scrub the marked sections. Check plosive closures, teeth, jaw, mouth edges and recovery after difficult frames.
- Run the translated version. Test both a literal translation and a duration-matched production rewrite.
- Repeat only failed shots. Count retries and record whether the second attempt fixes the same defect or creates a different one.
- Log repair time. Include cuts, audio shifts, masking or timeline work needed in the final edit.
This workflow quickly separates tools that make impressive demos from tools you can trust in a repeatable dubbing pipeline.
AI video lip-sync FAQs
What makes AI lip sync look unnatural?
The obvious cause is audio-to-mouth timing, but facial preservation is just as important. Unstable teeth, changing jaw shape, beard blur, generic open-close motion and visible jumps after occlusion can make a clip look artificial even when the broad rhythm follows the speech.
Can AI lip sync handle side profiles and facial hair?
Some modern systems are designed to handle difficult angles and obstructions, but capability claims should be tested with your footage. Use three-quarter turns, a full profile, and a return to camera, then compare the beard line, jaw, and teeth with the source. The transition into and out of profile is often more revealing than a static side view.
Does lip-sync AI fix bad translated audio?
No. It can make mouth movement follow the supplied speech, but it cannot make an awkward translation, rushed delivery or badly placed pause sound natural. Treat translation, voice generation and lip sync as separate stages first. Then test the combined pipeline once each stage is acceptable.
What to test first
If you only have enough credits for one serious trial, do not start with a clean frontal presenter. Build a 30-second reel containing a profile head turn, repeated p/b/m and f/v sounds, a brief mouth occlusion and a two-speaker handover. A system that survives those conditions is worth a longer localisation test.
The practical goal is not mathematically perfect mouth motion. It is footage a viewer can watch without noticing that the lower face has been rewritten. That requires timing, identity preservation, recovery, and production economics to hold up simultaneously.
You Might Also Like:
Best AI Video Generators

Best Image To Video AI

Best Free AI Video Generators 2026